Frequently Asked Questions
Table of Contents
- How do I start AutoCAD without loading OmniCADD files and the OmniCADD menu?
- How do I create a desktop shortcut for starting OmniCADD SDS 6.0, 7.0, 8.0, 9.0 without OmniCADD Explorer?
- How do I to fix a corrupted OmniCADD profile in AutoCAD?
- Some OmniCADD commands are not working. Why am I getting error: Block xxx can't be found?
- How do I install OmniCADD programs from the Internet?
- What OmniCADD programs should I install and in what order?
- How do I configure the firewall on my PC for OmniCADD software?
1. How do I start AutoCAD without loading OmniCADD files and the OmniCADD menu?
AutoCAD always starts with the last active profile by default. To modify this feature you need to change the AutoCAD desktop icon settings.
- Right-click AutoCAD Desktop Icon, select 'Properties...', then 'Shortcut' tab.
- Change 'Target' field to the following depending on AutoCAD version:
- AutoCAD 2000: "C:\Program Files\AutoCAD 2000\acad.exe" /p "<<Unnamed Profile>>"
- AutoCAD 2000i: "C:\Program Files\AutoCAD 2000i\acad.exe" /p "<<Unnamed Profile>>"
- AutoCAD 2002 : "C:\Program Files\AutoCAD 2002\acad.exe" /p "<<Unnamed Profile>>"
- AutoCAD 2004 : "C:\Program Files\AutoCAD 2004\acad.exe" /p "<<Unnamed Profile>>"
- AutoCAD 2005 : "C:\Program Files\AutoCAD 2005\acad.exe" /p "<<AutoCAD 2005 Unnamed Profile>>"
- AutoCAD 2006 : "C:\Program Files\AutoCAD 2006\acad.exe" /p "<<AutoCAD 2006 Unnamed Profile>>"
- AutoCAD 2007 : "C:\Program Files\AutoCAD 2007\acad.exe" /p "<<Unnamed Profile>>"
- AutoCAD 2008 : "C:\Program Files\AutoCAD 2008\acad.exe" /p "<<Unnamed Profile>>"
- AutoCAD 2009 : "C:\Program Files\AutoCAD 2009\acad.exe" /p "<<Unnamed Profile>>"
- AutoCAD 2010 : "C:\Program Files\AutoCAD 2010\acad.exe" /p "<<Unnamed Profile>>"
- AutoCAD 2011 : "C:\Program Files\AutoCAD 2011\acad.exe" /p "<<Unnamed Profile>>"
- AutoCAD 2012 : "C:\Program Files\AutoCAD 2012\acad.exe" /p "<<Unnamed Profile>>"
- Click OK.
- Start AutoCAD by double-clicking this icon.
2. How do I create a desktop shortcut for starting OmniCADD SDS 6.0, 7.0, 8.0, 9.0 without OmniCADD Explorer?
Copy and paste the existing AutoCAD icon on your desktop. Then,
- Right-click the newly created icon, select 'Properties...', then 'General' tab. Change icon name to OmniCADD 20xx, depending on which version of AutoCAD you are using.
- Select 'Shortcut' tab. Change Target line to:
- AutoCAD 2000: "C:\Program Files\AutoCAD 2000\acad.exe" /p "OmniCADD60" /t "OmniCADD.dwt"
- AutoCAD 2000i: "C:\Program Files\AutoCAD 2000i\acad.exe" /p "OmniCADD60" /t "OmniCADD.dwt"
- AutoCAD 2002 : "C:\Program Files\AutoCAD 2002\acad.exe" /p "OmniCADD60" /t "OmniCADD.dwt"
- AutoCAD 2004 : "C:\Program Files\AutoCAD 2004\acad.exe" /p "OmniCADD70"
- AutoCAD 2005 : "C:\Program Files\AutoCAD 2005\acad.exe" /p "OmniCADD70"
- AutoCAD 2006 : "C:\Program Files\AutoCAD 2006\acad.exe" /p "OmniCADD70"
- AutoCAD 2007 : "C:\Program Files\AutoCAD 2007\acad.exe" /p "OmniCADD80"
- AutoCAD 2008 : "C:\Program Files\AutoCAD 2008\acad.exe" /p "OmniCADD80"
- AutoCAD 2009 : "C:\Program Files\AutoCAD 2009\acad.exe" /p "OmniCADD80"
- AutoCAD 2010 : "C:\Program Files\AutoCAD 2010\acad.exe" /p "OmniCADD90"
- AutoCAD 2011 : "C:\Program Files\AutoCAD 2011\acad.exe" /p "OmniCADD90"
- AutoCAD 2012 : "C:\Program Files\AutoCAD 2012\acad.exe" /p "OmniCADD90"
- Click OK.
- Check the configuration of OmniCADD SDS by double-clicking this icon. When the new drawing starts, type INSERT in AutoCAD command line and click 'Enter.'. If the list of available objects includes only BORDER you will need to check your OmniCADD template settings as described in Q3.
3. How do I to fix a corrupted OmniCADD profile in AutoCAD?
When the OmniCADD menu and/or OmniCADD support files are not loading during drawing startup, most likely the OmniCADD profile is corrupted. To fix the OmniCADD profile, start "Options" command by typing it in the command line or selecting it from the list when right-clicking mouse inside the AutoCAD command window. Then follow instructions for your OmniCADD SDS version:
OmniCADD 5.6 for AutoCAD 14:
- Check that the profile OmniCADD56 is current. If not, switch to the 'Profiles' tab, select OmniCADD56 profile and click button 'Set Current'.
- Switch to 'Files' tab and open 'Support File Search Path' by clicking on a 'plus' sign.
- Check that the first three lines list OmniCADD support folders:
C:\OmniCADD\Sds56
C:\OmniCADD\Sds56\Dwg
C:\OmniCADD\Sds56\Sld
If these folders are present but do not occupy the first three lines, then move them up by selecting the folder and clicking the 'Move Up' button.
If the folders are not present, then add them by clicking 'Add', then 'Browse' and selecting the folder from the dialog. Then move these folders up to occupy the first three lines. - Open 'Menu, Help and Miscellanious Files' and then 'Menu File' by clicking on a plus sign.
Check that the menu file line reads
C:\OmniCADD\Sds56\OmniCADD.mnu.
If not, click 'Browse' and select the OmniCADD menu file.
OmniCADD 5.7 for AutoCAD 2000, 2000i, 2002:
- Check that the profile OmniCADD57 is current. If not, switch to the 'Profiles' tab, select OmniCADD57 profile and click button 'Set Current'.
- Switch to 'Files' tab and open 'Support File Search Path' by clicking on a 'plus' sign.
- Check that the first three lines list OmniCADD support folders:
C:\OmniCADD\Sds57
C:\OmniCADD\Sds57\Dwg
C:\OmniCADD\Sds57\Sld
If these folders are present but do not occupy the first three lines, then move them up by selecting the folder and clicking the 'Move Up' button.
If the folders are not present, then add them by clicking 'Add', then 'Browse' and selecting the folder from the dialog. Then move these folders up to occupy the first three lines. - Open 'Menu, Help and Miscellanious Files' and then 'Menu File' by clicking on a plus sign.
Check that the menu file line reads
C:\OmniCADD\Sds57\OmniCADD.mnu.
If not, click 'Browse' and select the OmniCADD menu file.
OmniCADD 6.0 for AutoCAD 2000, 2000i, 2002:
- Check that the profile OmniCADD60 is current. If not, switch to the 'Profiles' tab, select OmniCADD60 profile and click button 'Set Current'.
- Switch to 'Files' tab and open 'Support File Search Path' by clicking on a 'plus' sign.
- Check that the first three lines list OmniCADD support folders:
C:\OmniCADD\Sds60
C:\OmniCADD\Sds60\Dwg
C:\OmniCADD\Sds60Sld
If these folders are present but do not occupy the first three lines, then move them up by selecting the folder and clicking the 'Move Up' button.
If the folders are not present, then add them by clicking 'Add', then 'Browse' and selecting the folder from the dialog. Then move these folders up to occupy the first three lines. - Open 'Menu, Help and Miscellanious Files' and then 'Menu File' by clicking on a plus sign.
Check that the menu file line reads
C:\OmniCADD\Sds60\OmniCADD.mnu.
If not, click 'Browse' and select the OmniCADD menu file.
OmniCADD 7.0 for AutoCAD 2004, 2005:
- Check that the profile OmniCADD70 is current. If not, switch to the 'Profiles' tab, select OmniCADD70 profile and click button 'Set Current'.
- Switch to 'Files' tab and open 'Support File Search Path' by clicking on a 'plus' sign.
- Check that the first three lines list OmniCADD support folders:
C:\OmniCADD\Sds70
C:\OmniCADD\Sds70\Dwg
C:\OmniCADD\Sds70\Sld
If these folders are present but do not occupy the first three lines, then move them up by selecting the folder and clicking the 'Move Up' button.
If the folders are not present, then add them by clicking 'Add', then 'Browse' and selecting the folder from the dialog. Then move these folders up to occupy the first three lines. - Open 'Menu, Help and Miscellanious Files' and then 'Menu File' by clicking on a plus sign.
Check that the menu file line reads
C:\OmniCADD\Sds70\OmniCADD.mnu.
If not, click 'Browse' and select the OmniCADD menu file. - Open Template settings and then check the Drawing Template File Location line. It should read:
"C:\OmniCADD\SDS70\Dwt".
If not, click the Browse button and select that folder. - Check line Default Template File Name for QNEW line. It should read
"C:\OmniCADD\Sds70\Dwt\OmniCADD.dwt".
If not, then correct it.
OmniCADD 7.0 for AutoCAD 2006:
- Check that the profile OmniCADD70 is current. If not, switch to the 'Profiles' tab, select OmniCADD70 profile and click button 'Set Current'.
- Switch to 'Files' tab and open 'Support File Search Path' by clicking on a 'plus' sign.
- Check that the first three lines list OmniCADD support folders:
C:\OmniCADD\Sds70
C:\OmniCADD\Sds70\Dwg
C:\OmniCADD\Sds70\Sld
If these folders are present but do not occupy the first three lines, then move them up by selecting the folder and clicking the 'Move Up' button.
If the folders are not present, then add them by clicking 'Add', then 'Browse' and selecting the folder from the dialog. Then move these folders up to occupy the first three lines. - Open Customization Files' and then 'Main Customization File' by clicking on a plus sign.
Check that the menu file line reads
C:\OmniCADD\Sds70\OmniCADD2006.cui.
If not, click 'Browse' and select the OmniCADD2006.cui menu file. - Open Template settings and then check the Drawing Template File Location line. It should read:
"C:\OmniCADD\SDS70\Dwt".
If not, click the Browse button and select that folder. - Check line Default Template File Name for QNEW line. It should read
"C:\OmniCADD\Sds70\Dwt\OmniCADD.dwt".
If not, then correct it.
OmniCADD 8.0 for AutoCAD 2007, 2008, 2009:
- Check that the profile OmniCADD80 is current. If not, switch to the 'Profiles' tab, select OmniCADD80 profile and click button 'Set Current'.
- Switch to 'Files' tab and open 'Support File Search Path' by clicking on a 'plus' sign.
- Check that the first three lines list OmniCADD support folders:
C:\OmniCADD\Sds80
C:\OmniCADD\Sds80\Dwg
C:\OmniCADD\Sds80\Sld
If these folders are present but do not occupy the first three lines, then move them up by selecting the folder and clicking the 'Move Up' button.
If the folders are not present, then add them by clicking 'Add', then 'Browse' and selecting the folder from the dialog. Then move these folders up to occupy the first three lines. - Open Customization Files' and then 'Main Customization File' by clicking on a plus sign.
Check that the menu file line reads
C:\OmniCADD\Sds80\OmniCADD2007.cui (for AutoCAD 2007),
C:\OmniCADD\Sds80\OmniCADD2008.cui (for AutoCAD 2008),
C:\OmniCADD\Sds80\OmniCADD2009.cui (for AutoCAD 2009).
If not, click 'Browse' and select the corresponding OmniCADD menu file. - Open Template settings and then check the Drawing Template File Location line. It should read:
"C:\OmniCADD\SDS80\Dwt".
If not, click the Browse button and select that folder. - Check line Default Template File Name for QNEW line. It should read
"C:\OmniCADD\Sds80\Dwt\OmniCADD.dwt".
If not, then correct it.
OmniCADD 9.0 for AutoCAD 2010, 2011, 2012:
- Check that the profile OmniCADD90 is current. If not, switch to the 'Profiles' tab, select OmniCADD80 profile and click button 'Set Current'.
- Switch to 'Files' tab and open 'Support File Search Path' by clicking on a 'plus' sign.
- Check that the first three lines list OmniCADD support folders:
C:\OmniCADD\Sds90
C:\OmniCADD\Sds90\Dwg
C:\OmniCADD\Sds90\Sld
If these folders are present but do not occupy the first three lines, then move them up by selecting the folder and clicking the 'Move Up' button.
If the folders are not present, then add them by clicking 'Add', then 'Browse' and selecting the folder from the dialog. Then move these folders up to occupy the first three lines. -
Open Customization Files' and then 'Main Customization File' by clicking on a plus sign.
Check that the menu file line reads
C:\OmniCADD\Sds90\OmniCADD2010.cuix (for AutoCAD 2010)
C:\OmniCADD\Sds90\OmniCADD2011.cuix (for AutoCAD 2011)
C:\OmniCADD\Sds90\OmniCADD2012.cuix (for AutoCAD 2012)
If not, click 'Browse' and select the corresponding OmniCADD menu file. - Open Template settings and then check the Drawing Template File Location line. It should read:
"C:\OmniCADD\SDS90\Dwt".
If not, click the Browse button and select that folder. - Check line Default Template File Name for QNEW line. It should read
"C:\OmniCADD\Sds90\Dwt\OmniCADD.dwt".
If not, then correct it.
Click the 'Apply' button. Then create a backup of your OmniCADD profile by clicking the 'Export' button under the 'Profiles' tab. Later you will be able to restore the profile by clicking the 'Import' button and selecting the backup file. To finish, press the 'OK' button and restart the drawing.
4. Some OmniCADD commands are not working. Why am I getting error: Block xxx can't be found?
Most likely some of your OmniCADD template files are corrupted. To fix this error:
- Start the AutoCAD 'Insert' command by typing the command or clicking the corresponding AutoCAD button.
- Click the 'Browse' button and select C:\OmniCADD\Sdsxx\Dwg\OmniCADD.dwg file, where xx corresponds to the OmniCADD SDS version 56, 57, 60, 70, 80 or 90.
- Uncheck all 'Specify On-Screen' boxes.
- Set insertion point coordinates to zero value.
- Set scale multipliers to 1.0.
- Set rotation angle to 0.
- Check 'Explode' box.
- Click 'OK' button.
5. How do I install OmniCADD programs from the Internet?
Follow these instructions:
- Visit our website www.omnicadd.com/updates/default.html. Install the latest version of the Sentinel Drivers.
- From the same website install the latest version of OmniCADD Explorer.
- Open OmniCADD Explorer, Tools, OmniCADD Passport command.
- Fill out the registration form and click the 'Register' button.
- Check for e-mail registration confirmation with the OmniCADD activation code. Enter (copy & paste) this code into the Activation code field. Click 'Activate' button. If you did not receive the Activation code, check the e-mail address in the registration form. If it needs to be corrected, then click 'Reset' button, update the registration data and click 'Register' again.
- Open OmniCADD Explorer, Tools, Install from the Web command. Follow on-screen instructions to install products available to you. Contact OmniCADD if you are not able to install products you think you should be able to install, or to request quotes for new OmniCADD products.
- You will not need Serial Numbers with the Internet Installation procedure.
If you do not have Internet access then you can contact OmniCADD and ask for a new Installation CD.
6. What OmniCADD programs should I install and in what order?
All users need to install:
- Sentinel Drivers for the hardware lock. Drivers install automatically when you insert the OmniCADD Setup CD. You can download them from www.omnicadd.com/updates.htm.
- OmniCADD Explorer. You can download it also from www.omnicadd.com/updates.htm.
- If you have OmniCADD SDS starting from version 6.0 and/or OmniCADD Stocklisting program, install OmniCADD MDB after installing OmniCADD Explorer and before the SDS and Stocklisting installation. Please note that OmniCADD MDB is not a program, it is a database. It needs to be installed only once. It requires regular backups (you will be prompted to backup). Use OmniCADD Explorer, Tools, OmniCADD MDB, Backup and Restore commands for database maintanance operations. Also remember that OmniCADD MDB can be installed on a server computer. In that case, other users from you company should run OmniCADD Explorer, Tools, OmniCADD MDB, Register command to set up the appropriate links to the database on their computers. All data from the OmniCADD database will be shared by all users.
- If you have SDS Software starting with version 6.0 and up and do not have Stocklisting & Fabrication
software, then install OmniCADD Database Manager 7.0.
If you have Stocklisting & Fabrication Software, then install that program. - After that, you can install the OmniCADD HCS, OmniCADD SDS programs in any order.
The OmniCADD Database Manager program (OmniCADD DBM 7.0) should not be confused with OmniCADD MDB. It only needs to be installed by OmniCADD SDS users of version 6.0 and later, who don't have a license for the OmniCADD Stocklisting program. OmniCADD DBM is an integral part of the OmniCADD Stocklisting program which allows users to manage OmniCADD MDB items.
7. How do I configure the firewall on my PC for OmniCADD software?
Registration of OmniCADD software and
software lock functionality may require some
reconfiguration of your PC firewall.
If you own OmniCADD software with
a hardware lock and are not subscribed to a maintenance
agreement, then registration is optional and you can skip this section.
If, during the registration process or during the software lock validation
operation you receive some Internet connection errors, like "Webserver
error=-1" message, then you will need to reconfigure the firewall.
First, check that OmniCADD website is up. Start Internet browser and visit our website www.omnicadd.com. If website is down, simply wait until it will be up again.
There are multiple firewall programs on the market, like McAfee, Norton, CA, ZoneAlarm, etc. All these programs have different user interfaces, but the configuration process will be somewhat similar for all products. Generally, you would find firewall settings, select trusted programs or programs config section, select OmniCADD Explorer from the list and allow it to connect to the Internet.
Below are detailed instructions for Norton Internet Security 2011:
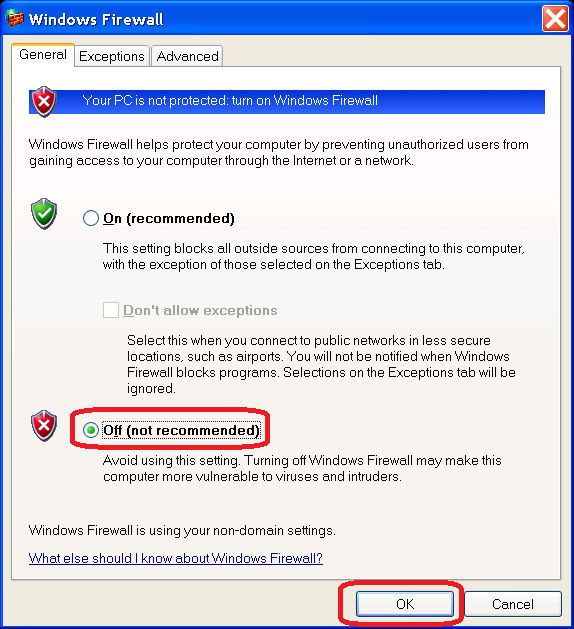
- Check that Microsoft Windows firewall is turned off.
Windows 7: click Start, Control Panel, System and Security, Windows Firewall, Check firewall status. If firewall is on then turn it off. Final result should look like this:

Windows XP: click Start, Control Panel, Windows Firewall. Check "Off" option and click OK:
- Open Norton Internet Security 2011. Click Settings:
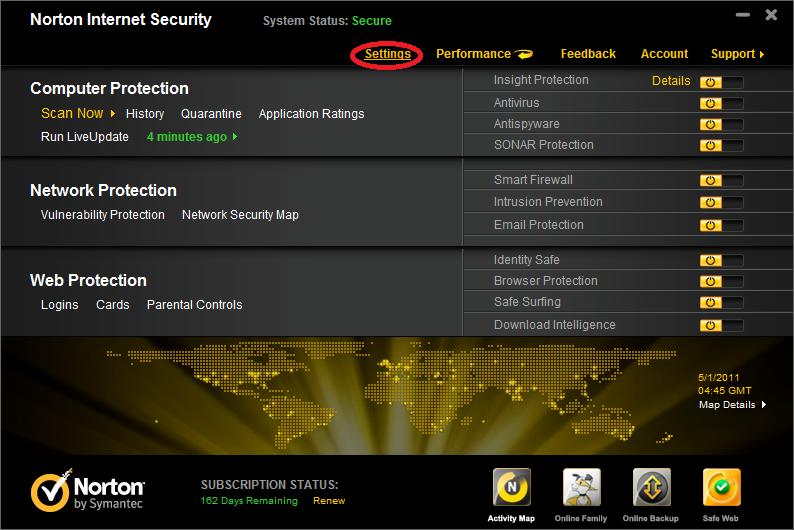
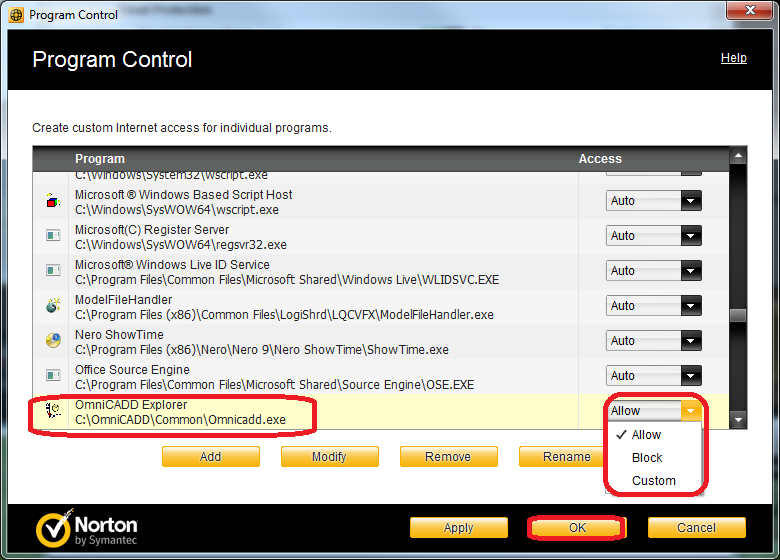
- Click Network Settings and then Configure Program Control:
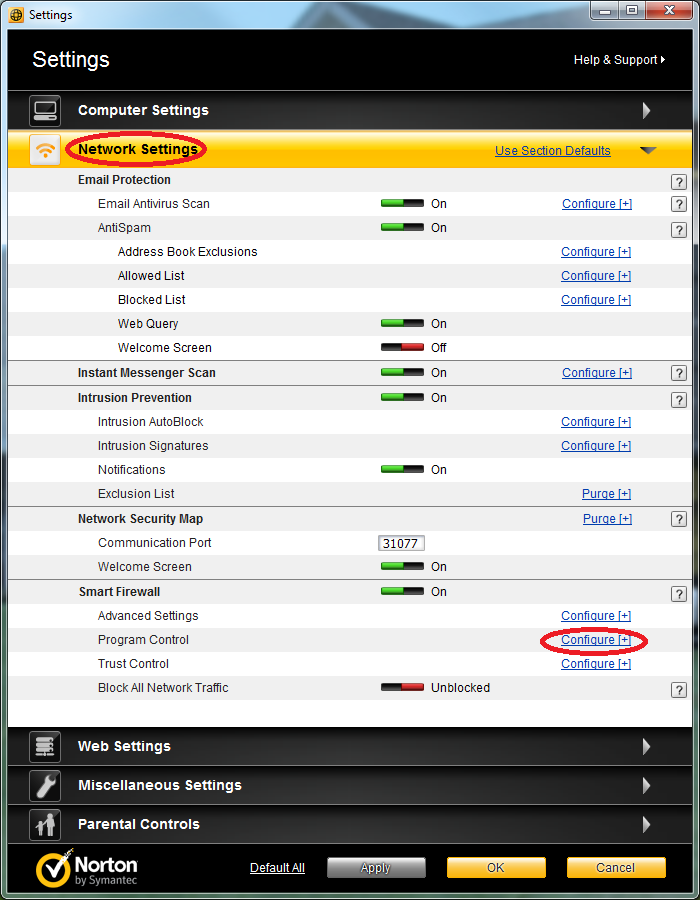
- Scroll the list, find OmniCADD Explorer, select option Allow and click OK: